Sign in
Open the team URL and use the credentials provided by the project administrator.
Practical team handbook
A shared way of working for planners, landscape designers, visualization teams, and reviewers developing park concepts remotely in the Collaborative Design Configurator.
01 · Quick start
Use this four-step sequence for a first working session. It establishes the correct plan, captures an edit, and leaves the shared project in a known state.
Open the team URL and use the credentials provided by the project administrator.
Select the intended concept plan. Choose Use layout in project so it becomes part of the active configuration.
Choose a layer, double-click the plan to add an item, then use the Properties panel to name and refine it.
Select Save project. Download JSON as a portable snapshot when the option is ready for review.
Canvas edits update your active browser session immediately, but Save project writes that state to the authoritative project configuration. Agree who saves during a live team session.
02 · Workspace map
The interface separates navigation, spatial editing, detailed properties, and project-level actions so the team can move from broad composition to precise review.
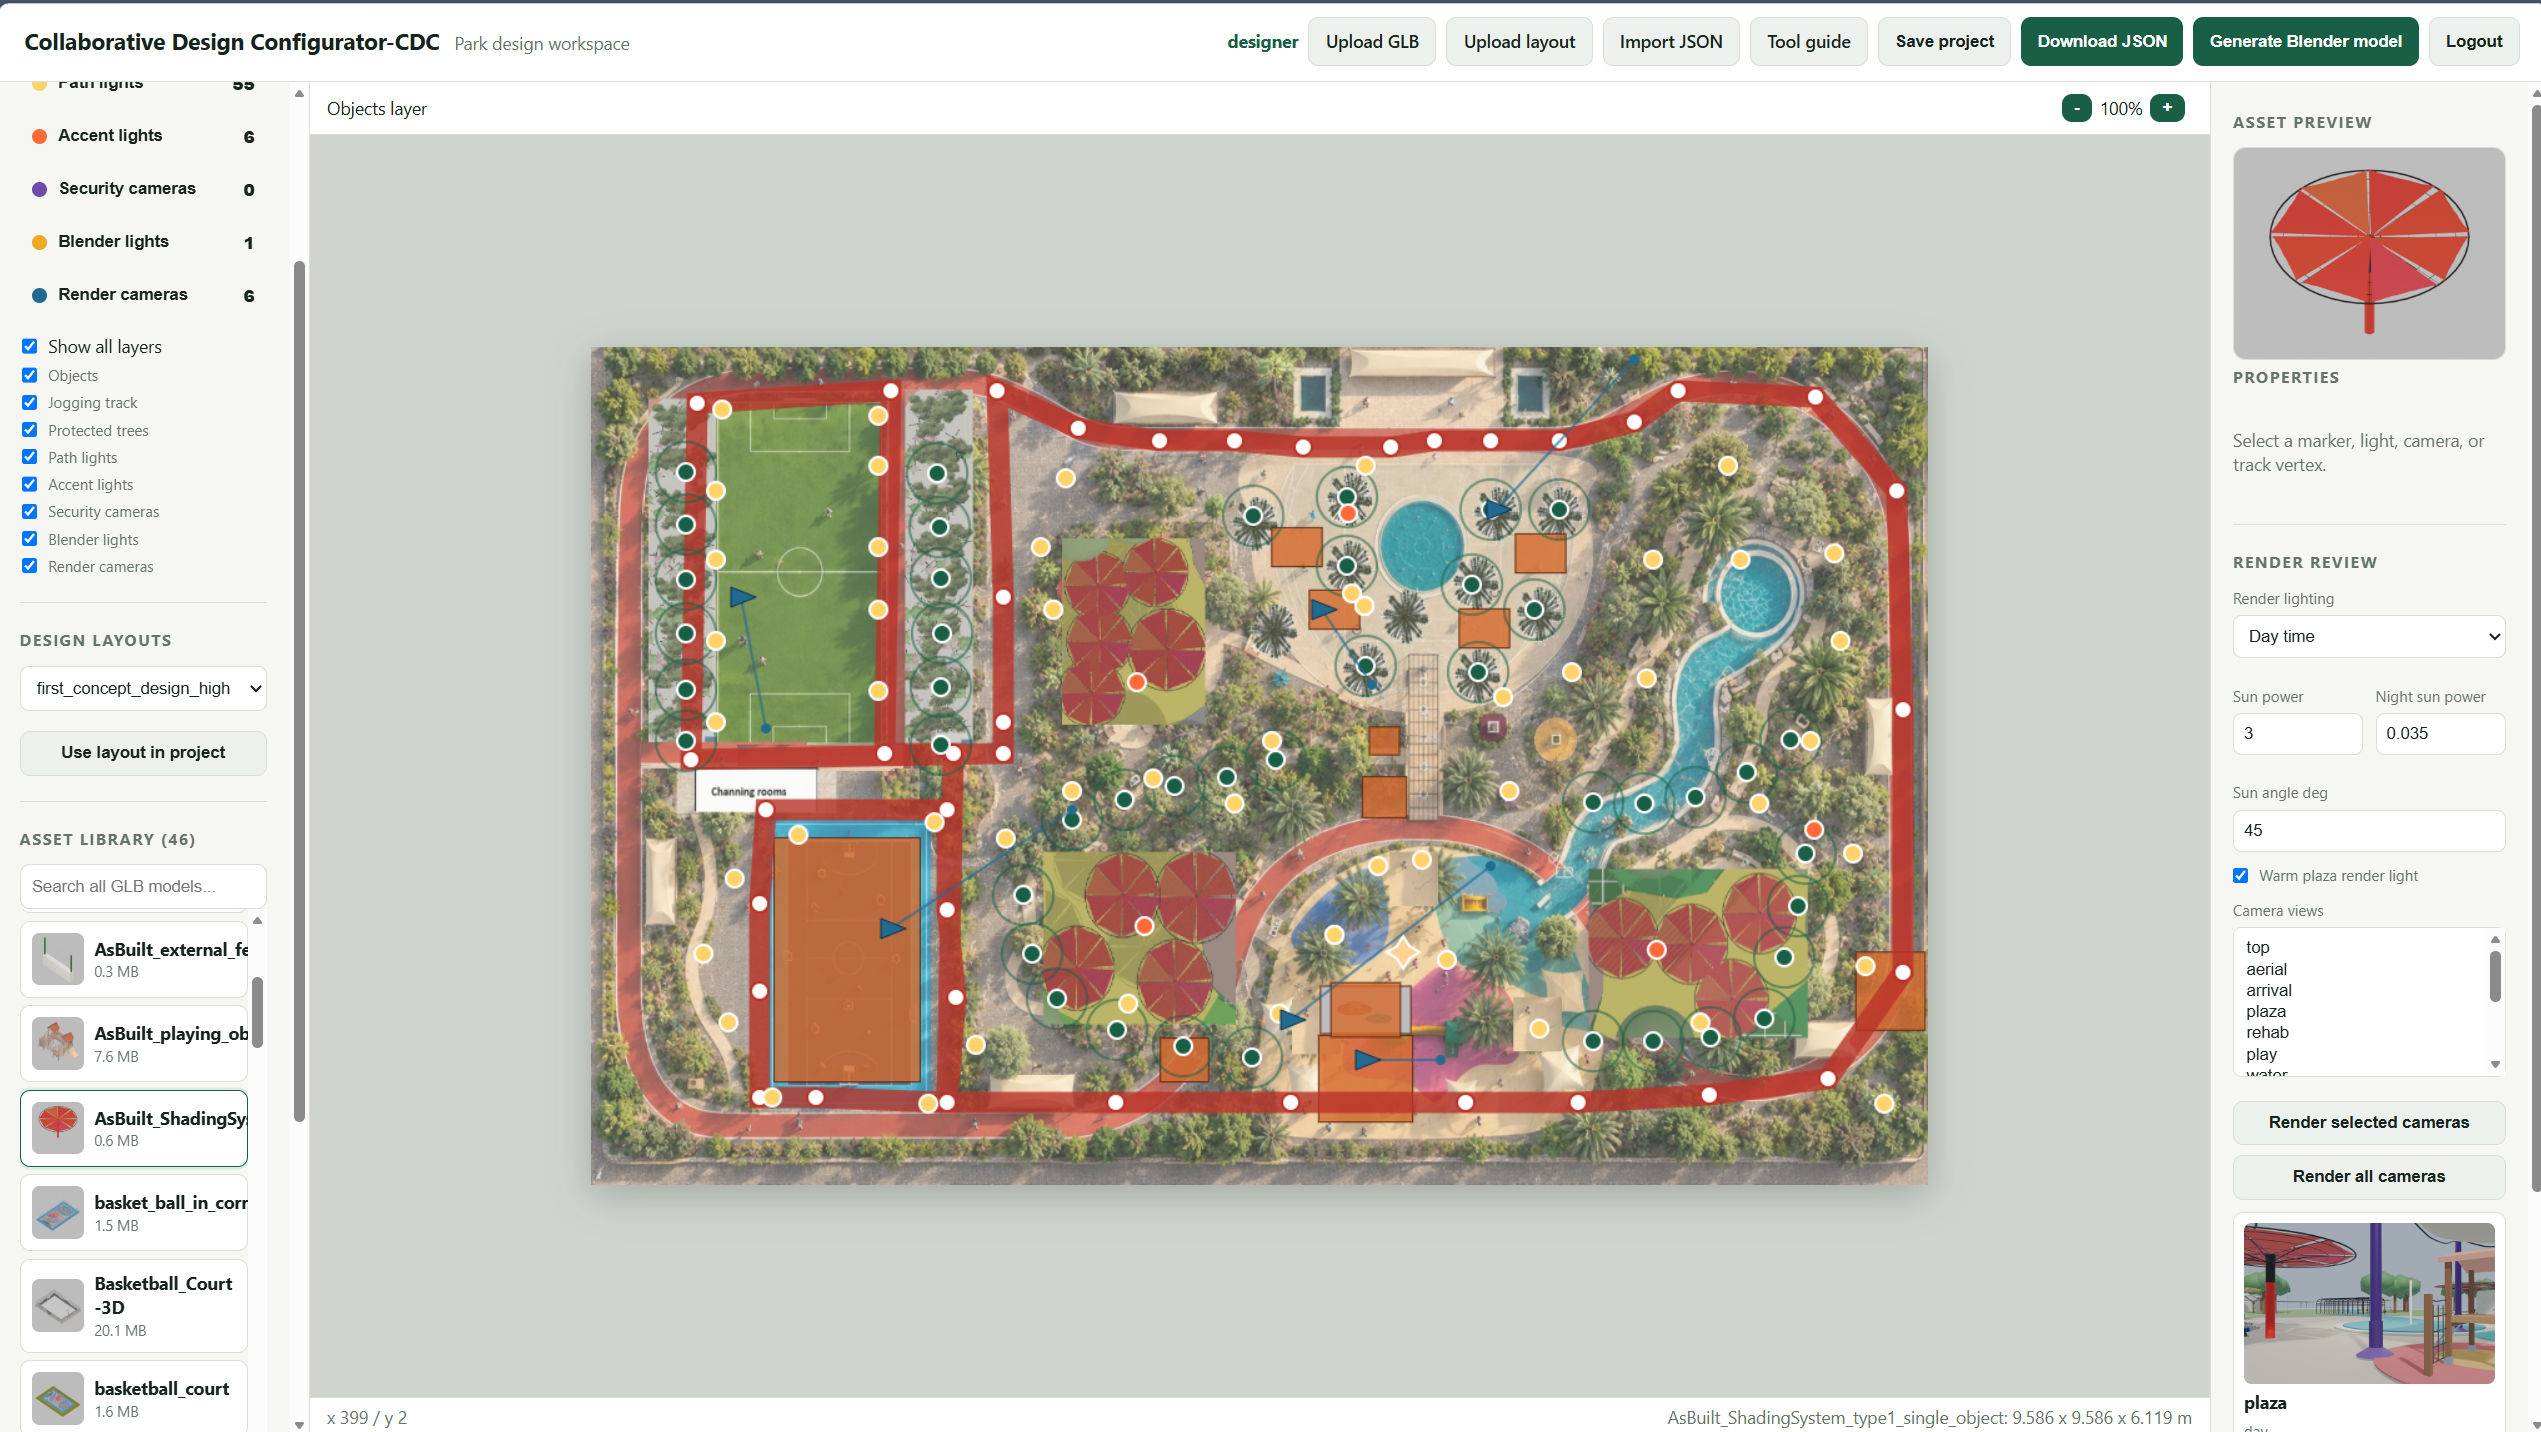
03 · Team roles
CDC does not force formal permissions for every discipline. Use lightweight team roles to prevent conflicting edits and make review responsibilities explicit.
Maintains the active layout, places program elements, develops paths, and coordinates protected trees and site constraints.
Registers GLB assets, verifies dimensions, defines render cameras and lights, and generates day/night review images.
Names the option under review, checks discipline inputs, records decisions, and authorizes the shared save or output milestone.
04 · Shared workflow
Treat each design alternative as a short, traceable cycle. The objective is not simply to move objects; it is to turn design intent into a state the whole team can inspect.
State the decision before editing: for example, “increase shaded family seating without narrowing the jogging loop.”
Good review questions are spatial and testable.Confirm the selected plan, show the relevant layers, and set reference transparency so existing and proposed information are easy to distinguish.
Add or reposition assets, edit dimensions and properties, and keep names meaningful enough for another team member to understand.
Use visibility toggles, security coverage, tree protection radii, camera views, and lighting modes to test the option against the original question.
Apply pending property changes, save the shared project, download JSON for a named snapshot, and generate renders or Blender output when required.
Communicate immediately after the shared save.05 · Design layers
Selecting a layer changes what a double-click adds and which properties become available. Turn on Show all layers for coordination; isolate a layer for precise editing.
06 · Editing actions
Use direct manipulation for early composition and the Properties panel for controlled adjustments. Expand a topic below for the exact sequence.
Choose Duplicate for a nearby copy. Alternatively, copy and paste from the Properties panel or use Ctrl + C and Ctrl + V. Paste only works while the matching layer is active.
Upload a PNG, JPG, JPEG, or WebP if needed. Select it under Design layouts, visually confirm it, then choose Use layout in project. Adjust reference transparency to compare information.
Select the marker, vertex, light, camera, or object; verify its name and layer in Properties; then choose Delete. Save only after confirming that the resulting plan is correct.
07 · Review & output
A clean output begins with a deliberate review state. Use these two checklists before rendering cameras or producing the coordinated Blender model.
Use camera renders for focused design conversations, JSON for a portable configuration snapshot, and the generated .blend file when the selected option needs visualization or further 3D development.
08 · Team conventions
The configurator stores one authoritative design state. Simple working agreements reduce collisions and preserve the reasoning behind each milestone.
Use descriptive asset and camera names such as family_shade_north_option_b or arrival_evening_review.
Others can direct, observe, or record decisions, but nominate one person to make and save edits during a live session.
Download JSON after an agreed option—not after every movement—and include the option name and date when storing it externally.
After saving, tell the team which layers changed, which review question was addressed, and which output should be inspected.
09 · Administration
The current login is intentionally simple and suitable for a managed design team. Internet-facing deployment needs the usual production safeguards.
Usernames and shared passwords are managed in users.json. Use team-specific credentials and update them before sharing the deployment.
The server writes the saved configuration to scripts/park/config.json. Include it in the project backup routine.
GLB files are stored under Inputs/3Dobjects; layouts are stored under Inputs/design_layouts.
Previews, generated Blender models, JSON reports, and rendered images are stored under storage. Manage storage and retention as the project grows.
Put HTTPS through Nginx or Caddy in front of the service and configure firewall rules, request-size limits, backups, and access logging. Because CDC accepts uploads and can run Blender, do not expose it with default or broadly shared credentials.
Ready for the next review?
Start with a clear question, nominate the active editor, and leave the project in a saved, reviewable state.